WindNerd One(-S) Sensor check & Wi-Fi Setup
Sensor and Magnet Check
-
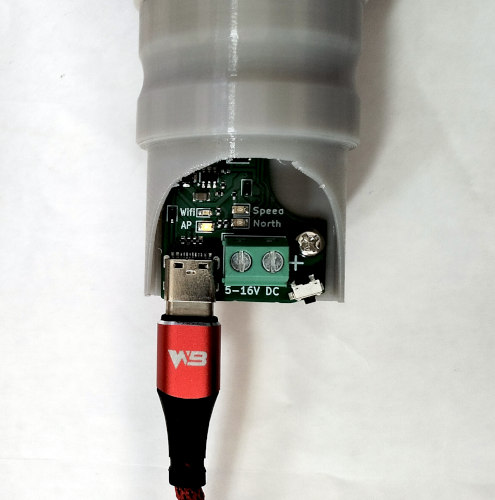
Connect the device to power using the USB-C connector.
-
The electronic board has 2 green LED indicators to check if the sensors and magnets are working correctly.
- By turning the rotor by hand, the speed LED should blink with each rotation.
- Rotate the vane slowly to find the position where the North LED lights up. It should match the arrow indicating north.
The North and South directions may be reversed depending on how the vane magnet is mounted. If this occurs, press the switch for 3 seconds to invert the polarity. This setting can also be adjusted later from the local web configuration page.
Wi-Fi Configuration
No communication occurs through the USB port; the device needs to be connected to a Wi-Fi network to communicate with the world.
First start
-
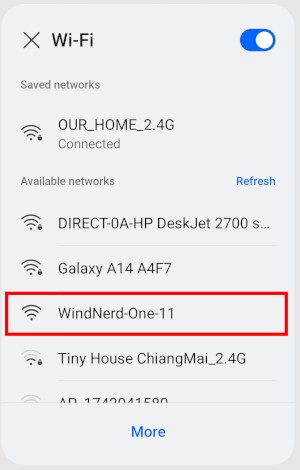
When out of the box or after a factory reset, it starts in Access Point mode. Any computer, smartphone, or tablet should be able to see and connect to the "Windnerd-One-xx" Wi-Fi network.
-
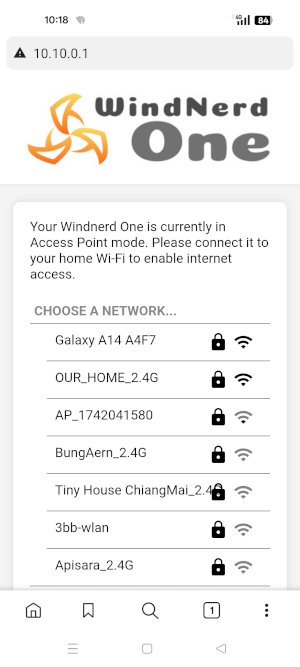
After connecting, you may be automatically redirected to a setup page (depending on the device). If not, open a browser (like Chrome or Safari) and go to 10.10.0.1 to access the WindNerd One.
-
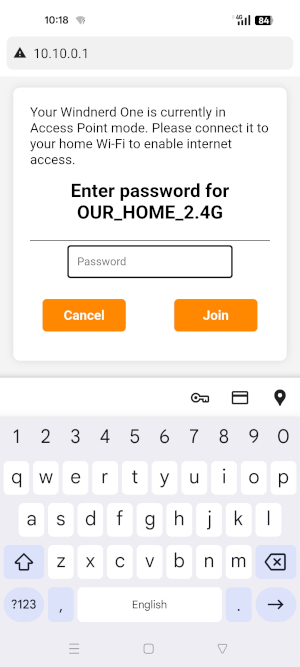
After scanning, a list of available Wi-Fi networks will appear. Select the network you want the WindNerd One to connect to and enter the password.
-
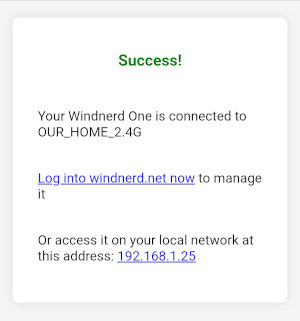
Once the connection is successful, a confirmation message will appear, indicating that the WindNerd One is now operating as a station (client).
-
When the blue LED turns solid, the WindNerd One has connected to windnerd.net.
Raspberry Pi and other Linux hotspot compatibility
Hotspots created with NetworkManager (used by many Linux systems including Raspberry Pi OS) may advertise multiple Wi-Fi security protocols at the same time.
This can cause compatibility issues with the WindNerd One(-S) during the Wi-Fi authentication phase.
If the device cannot connect to a hotspot managed by NetworkManager, configure the hotspot to use WPA2-PSK (RSN) only.
- List available connections to identify the hotspot name:
nmcli connection show
- Force WPA2-PSK security for the hotspot:
sudo nmcli connection modify "<HOTSPOT_NAME>" 802-11-wireless-security.key-mgmt wpa-psk
sudo nmcli connection modify "<HOTSPOT_NAME>" 802-11-wireless-security.proto rsn
- Restart NetworkManager or reconnect the hotspot:
sudo systemctl restart NetworkManager
After applying these settings, reconnect the device to the hotspot.