WindNerd One(-S) installation
Power Source
The USB connector is convenient for testing, but not recommended for permanent installation.
For long-term reliability, connect a power source directly to the wire terminal block (One) or XH2.54 wire-to-board connector (One-S).
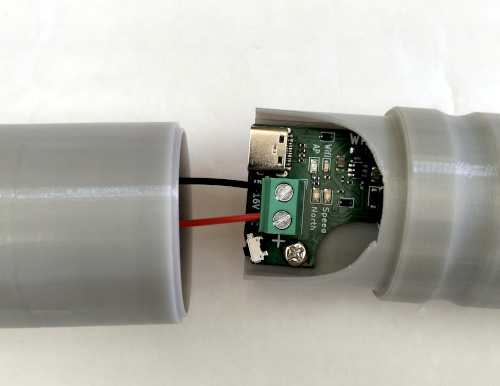
The correct polarity must be observed, but accidental reversal is safe as long as the maximum voltage is not exceeded.
WindNerd One
The WindNerd One is suitable when an external power source is available.
The device typically consumes in average:
| Supply Voltage | Typical Current | With Wi-Fi Max Power Saving |
|---|---|---|
| 5 V | ~23 mA | ~18 mA |
| 12 V | ~10 mA | ~8 mA |
From DC adapter
- Most USB power adapters are compatible. The USB plug can be removed and the positive/negative wires connected directly to the terminal block.
- At 5 V (USB voltage), long cable runs are not recommended, as voltage drop may prevent proper operation.
- Many power supplies from other electronic devices can also be repurposed, provided they fall within the 5–16 V range and can deliver at least 150 mA peak current.
- If the cable needs to be extended over several meters, using a 9–12 V supply is preferable.
From batteries
The WindNerd One can be powered from
- 12 V lead-acid battery (commonly used in UPS, vehicles, or solar setups).
- 2-cell or 3-cell lithium batteries (Li-ion / LiFePO4).
WindNerd One-S
The WindNerd One-S is preferable when the device must operate independently using a dedicated battery and solar source.
Once connected to Wi-Fi, the device typically consumes in average:
| Supply Voltage | Typical Current | With Wi-Fi Max Power Saving |
|---|---|---|
| 4 V | ~15 mA | ~10 mA |
The WindNerd One-S can further reduce power consumption to as low as 1.5 mA during periods of low sunlight.
In Eco mode, Wi-Fi is not permanently connected; it reconnects every 1, 2, or 5 minutes to publish data to remote services.
The local configuration webpage and local HTTP API are not accessible in this mode.
From Sunbank
- The Sunbank is a solar power kit especially made for the WindNerd One-S.
From batteries
- 1-cell lithium battery (Li-ion / LiFePO4).
To complement with solar charging, use a solar panel between 1 W and 3 W, depending on your location and sun exposure.
From DC adapter
- Most USB power adapters are compatible.
- Avoid extending the cable length when operating at 5 V to prevent voltage drop issues.